Wednesday, August 21, 2013

Chicken & Veggie Lavash

My boyfriend's mother is an amazing cook.

I look forward to the days that I get to go her house for dinner because I know I will be fed a meal that will make my tummy oh so happy.

She introduced me to this amazing creation a few months ago and I just think it is way too good not to share.

This meal is one of my boyfriend's favorites too.  He grew up eating this and it is an absolute treat when his mom makes it-- you know something is being celebrated when this is in the oven.

Now, don't be afraid of the name "lavash". Think a giant cracker-y crust that holds LOTS of yummy goodness.


It is oh so simple and delicious. (That's all that matters, right?)

So let's all say a big THANK YOU to my boyfriend's mom and her amazing dinner creations.  You are going to love it.


Ingredients:
1 Lavash cracker,  she uses Valley Lahvosh Cracker Bread (comes in a large paper bag containing 3- you can use whole wheat or regular- we find ours at Safeway)

2 chicken breasts, poached and shredded
10 slices of Havarti cheese
1 broccoli crown, par-cooked in microwave
1 bundle of asparagus, par-cooked in microwave
1 medium red onion, peeled, sliced, and sauteed
Extra Virgin Olive Oil
1/3 cup frozen spinach, thawed and drained
1 avocado, seeded, peeled, and sliced

Directions:
Add chicken breasts to the bottom of a large pot. (Make sure they are in a single layer and not overlapping). Fill the pot with enough water to submerge the chicken breasts completely under the water.  Bring to a boil.  Once boiling, cover the pot and turn the heat down to a simmer.  Let the chicken breasts simmer until they are cooked through, or completely white when cut through.  (Time may vary depending on how large your chicken breasts are, mine were small so it only took about 20 minutes.)


Once cooked through, let the chicken breasts cool and begin shredding with a fork.  Shred all of the chicken.  Set aside.


Veggie time!!! Wash your asparagus and broccoli and chop into bite size pieces.  I cut my asparagus on an angle and just chopped my broccoli.  Thinly slice your red onion.


Add broccoli and asparagus to a microwave-safe bowl filled with a small amount of water.  (About 1/4 of the bowl should be filled with water.)  Wet a piece of paper towel and place over the top of the bowl.   Microwave for about 6-7 minutes until veggies are soft and tender.  Drain the water from the veggies and pat the veggies dry.  Set aside.  

Drizzle a small pan with some EVOO.  Heat over medium heat and add the sliced onions.  Cook just until they are translucent and slightly caramelized.  


Don't forget the spinach and the avocado!  Put the spinach in a microwave-safe bowl.  Heat for a minute to thaw out the spinach.  Let cool and squeeze out all of the excess water.  Pat dry with a towel.

Carefully take out the seed from the avocado and scoop out the meat.  Thinly slice the avocado meat.  Set aside.  


Building time! Start with a a package of these delicious Lahvosh crackers.  Be extremely careful because these crackers are super fragile and you want them to stay in tact.


Carefully, take out one cracker and set on a flat cookie sheet.


Add six pieces of the Havarti cheese in a single layer on the Lahvosh cracker.


Sprinkle the shredded chicken all over the Lahvosh in an even layer.


Add the onions in an even layer.


Add the asparagus and broccoli.


Add the sliced avocado and the spinach.  (I just blotted the spinach in about 1/4 tsp balls all over the pizza).


Finally, evenly lay out the last 4 pieces of Havarti cheese over the veggies and cheese.


Bake at 350 degrees F for 30 minutes until cheese is melted and the veggies and chicken are hot!  Slice with a pizza cutter and serve immediately! ENJOY!


Thursday, June 20, 2013

Baked Eggplant Parmesan

Can I just tell you how thrilled I am that it is FINALLY summer?!

And nothing beats summertime than a delicious, light, yummy meal after a day full of splashin', swimmin', and sweet sunshine.

This eggplant parm is full of flavor and, because it is baked, it is light and doesn't make you feel guilty when you stuff your face with it.. especially during swim suit season.

Crispy eggplant smothered in homemade marinara sauce topped with ooey-gooey cheese... c'mon, there is just nothing better.

Here's to a good summer :)


Ingredients:
2 eggplants, cut into 1/2" rounds
1 cup Italian breadcrumbs
3 egg whites, beaten
1 small yellow onion, diced
4 garlic cloves, minced
1 1/2 tsp crushed red pepper
1 30-oz jar crushed tomatoes
1 TBS tomato paste
1/2 tsp kosher salt
1/4 tsp freshly ground pepper
1/3 cup basil leaves, chopped
2 cups mozzarella cheese, shredded
1/2 cup Parmesan cheese, shredded

Directions:
Preheat the oven to 350 degrees F.  Cut the eggplants into rounds about 1/2" thick and lay out on to cooling racks.  Sprinkle with Kosher salt and allow the eggplants to sit (sweat) for 30 minutes.


After the eggplant rounds have sweat for 30 minutes, take the rounds off of the cooling rack and spray the cooling rack with non-stick cooking spray and place over a cookie sheet covered in tin foil.  Create a dredging station to dredge the eggplant.  In one bowl place 3 egg whites and beat.  In a shallow plate add bread crumbs.  Place the cookie sheet with the cooling rack on top at the end of your station. (Shown in picture below).

First, dip the eggplant round in the egg whites.  Make sure the round is completely submerged in the egg whites.


Next, coat the eggplant in the bread crumbs.


Add the eggplant round to the sprayed cooling rack and repeat with all of the eggplant rounds.


Put the eggplant in the oven and bake for 30 minutes.

While the eggplant is baking, add a drizzle of extra virgin olive oil to a large saute pan and head over medium heat.  Add diced onion and minced garlic.  Cook until onions are translucent and tender, about 3 minutes.  Add crushed red pepper flakes and stir together.


Add crushed tomatoes and tomato paste let it simmer for about 5 minutes.  After it has simmered, add salt and pepper, as well as the chopped basil.  Stir together and take off of heat.


After the eggplant has baked for 30 minutes, take out of oven and set aside.  They should be golden brown and crisp.


In a 9x28 baking dish, add a single layer of eggplant.  Continue to top with another single layer, until you use up all of the eggplant.  Using a 9x28 baking dish, I ended up having two layers.


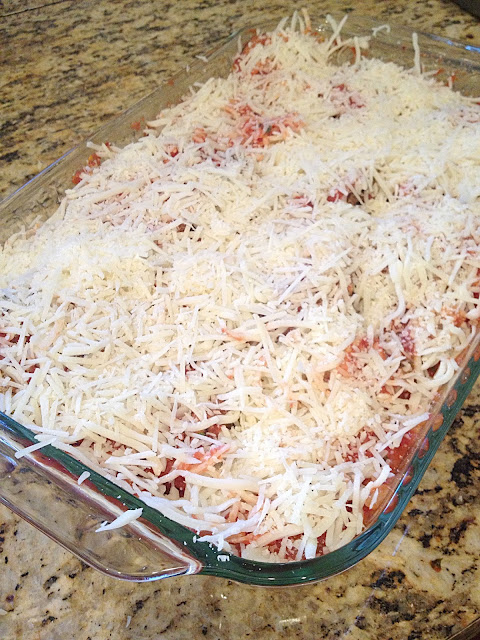
Pour all of the sauce over the eggplant rounds. (I lifted a few rounds from the top layer and shoved some sauce in between the layers, just so the sauce is all over each round.) Top the sauce with the shredded cheese in an evenly distributed layer.


Place baking dish in oven and bake for 30 minutes.  Turn broiler on high and broil until cheese gets all bubbly and brown on top! Serve immediately and ENJOY!


Tuesday, May 14, 2013

Open-Faced Green Onion & Cheddar Cheese Stuffed Sliders

So if the name isn't a mouthful enough, just wait until you get an actual mouthful of this delicious meaty cheesey goodness.

The other day I was shopping at Sprouts and came across these sliders.  Obviously, I am obsessed with cooking my own meals, rather than buying pre-made items, (I mean where is the fun in that?!) sooo I figured I would create my own!  I also love cooking myself, because I can control what type of meat (extra lean), cheese (reduced-fat), and how much salt (a tiny amount) goes into the dish!


Anyways, these burgers may be tiny but they are definitely not tiny in flavor.  The cheese and onions within the meat give these babies a whole 'nother dimension. Oh, and the cheese on top just adds more cheesy-salty goodness.

These little guys cook faster than the average burger, so you won't be sitting on the edge of your seat, drooling while you wait patiently, smelling that delicious-smokey-cheesey-peppery smell that perfumes the air every time you make burgers.  You know exactly what I am talking about..

So, I mean if I haven't persuaded you enough yet.. just wait.  You will la-la-love these.


Ingredients:
1 lb. 80/20 lean ground beef
1/2 cup shredded reduced-fat cheddar cheese
3-4 green onions, thinly sliced
1 tsp freshly ground pepper
1 tsp garlic powder
1 tsp Kosher salt
2 slices reduced-fat cheddar cheese, broken up into 1 1/2-in square pieces

Directions:
In a large bowl add your ground beef.  Roll up your sleeeve and take off any jewelry on your hands/arms because you are about to get up close and personal with this meat... So much fun, I know.


Add your shredded cheese, sliced green onions, pepper, garlic powder, and salt.


Stick your hands in the bowl and just start mixing all of the ingredients together.  Make sure every ingredient is really incorporated into the meat.  Don't over mix (or keep blending the ingredients together after they are already incorporated), this will cause your meat to become tough.  


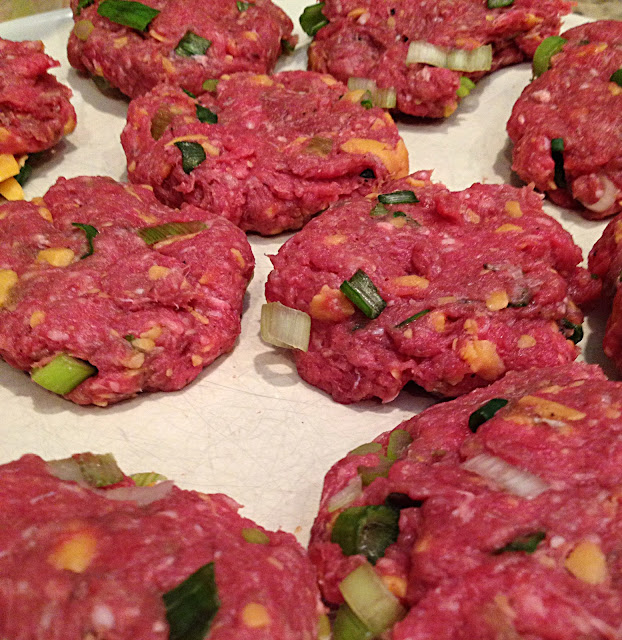
Take about a palm-full of meat in your hand, round the meat into a ball and then flatten.  I made 12 patties, but depending on your preference of slider-size, this number may vary.  Make sure each patty is roughly the same size so they can cook evenly!  Also, if you make this earlier in the day, make sure you cover patties with plastic wrap and put in fridge until you are ready to grill!


Once ready to grill, turn grill on to medium-high heat.  I grilled my burgers inside but feel free to grill outside as well!  Spray grill liberally will non-stick olive oil cooking spray. Sprinkle freshly ground pepper onto both sides of each slider.  Place the burgers the grill and cook for about 7-10 minutes on each side or until they are done to your preference.  But WAIT there is one more step...


A few minutes before you take your burgers off the grill, place a small piece of cheese on each slice and allow it to melt onto the burger.  Take off the heat and EAT! (Preferably with sweet potato fries- my fave :) )


Tuesday, April 23, 2013

Baked Parmesan Chicken Fingers

I crave chicken fingers a lot.

Like a lot a lot.

Unfortunately, no matter how much my craving overtakes my body, I know that eating fried food all of the time doesn't really help me maintain a healthy and toned figure ... (sad day, I know).

So.. what to do, what to do...

Oh, I know... 

Create a delicious, crunchy, crispy, and healthy chicken finger that I can eat all of the time...

And let me tell you, I did just that.... and they are awesome.

White, tender chicken breast dipped in Panko bread crumbs and shredded Parmesan cheese and then baked off until crispy and golden brown.  Yeah. One word: Delicious.

These tenders will totally kick that greasy craving to the curb!

The addition of salty Parmesan cheese and crisp Panko bread crumbs makes these no ordinary chicken fingers. Dip em' in some marinara sauce and you've got yourself a 'winner winner chicken dinner' meal on your plate!


Ingredients:
1 lb. chicken breast tenders
1/2 cup all-purpose flour
1 tsp garlic salt
1 tsp garlic pepper
1 1/2 tsp red chili flakes (optional-- I love the extra kick!)
3 egg whites, beaten
1 cup panko bread crumbs
1 cup shredded Parmesan cheese
1 jar favorite marinara sauce

Directions:
Prepare a cookie sheet with tin foil and spray with non-stick olive oil cooking spray.  Preheat your oven to 375 degrees F.  Prepare your chicken breast tenders on a plate.


Prepare three shallow bowls for your dredging station.  The first bowl should have the flour, garlic salt, garlic pepper, and chili flakes.  Mix together. The second bowl should have egg whites, beat with a fork until slightly foamy.  Finally, the third bowl should have the Panko and the Parmesan, mixed together.  

The first step of dredging your tenders is to completely coat a chicken finger in the flour mixture.  Shake off excess flour.  


Next, dip the chicken finger in the egg whites.  Make sure it is completely submerged in the egg whites.  


Lastly, coat the chicken finger with the Parmesan and Panko mixture. 


Place chicken finger on cookie sheet and repeat with the rest of the tenders.


Place chicken fingers in oven and cook for 25-30 minutes or until the inside of the chicken is completely white when cut in half.  In a small sauce pan heat up marinara sauce on low heat.  Serve along side with the chicken fingers and enjoy! :)


Monday, April 1, 2013

Baked Lasagna Rolls

Okay so if Lasagna isn't good enough...

Like seriously, I am kind of obsessed with lasagna... the layers of smooth and creamy Ricotta, Mozzarella, and Parmesan cheeses, the soft and tender noodles, and you cant forget about the tangy tomato sauce.  Oh, and the meat! Italian sausage is my fave in a basic baked lasagna dish.

But sorry, this isn't your typical Lasagna..

And as my grandmother said, "It may just be better"...

So yes, Lasagna rolls are that good.

And let me tell you why...

Not only are they super duper easy to make, they are the perfect single serving size, and each bite is equally, if not more, delicious than the last.  Oh, and they are LOADED with cheese, spinach, and some more cheese.  Like really, how does that not sound good?

I tend to make these without meat, but the best part about this recipe is that it is so easy to play around with.  So feel free to add chicken, ground beef, or Italian sausage.

These little roll-ups are honestly one of my favorite dishes to make any night of the week.  Whether you are trying to impress someone, or you just want to cook something delicious and easy for yourself, I promise you cannot go wrong with these little guys!


Ingredients:
10 Lasagna noodles, cooked al dente (This recipe usually makes about 8 roll-ups- I just do 10 in case one breaks in the pot)
1 10-oz. package of frozen spinach, thawed and drained (squeeze out excess liquid)
1 15-oz. container of low fat Ricotta cheese
1 egg
2 cups Mozzarella cheese, shredded and divided
3/4 cup Parmesan cheese, shredded and divided
1/4 tsp Kosher salt
1/4 tsp freshly ground pepper
1-2 cans of your favorite tomato sauce

Directions:
Preheat the oven to 450 degrees F.  Fill a large pot about 3/4 the way full and bring to a boil over high heat.  Add about 10 Lasagna noodles and cook for about 10 minutes until they are al dente.  (Cooked through but still have a good bite).  While the noodles are cooking, combine the spinach, ricotta, egg, 1 cup of the mozzarella, 1/2 cup Parmesan, salt, and pepper in a large bowl.  Make sure the ingredients are mixed well.


Set bowl aside.  In a 9x9 baking dish, add half of your favorite tomato sauce and spread out evenly.


Once the noodles are done cooking, lay out a few carefully on a cookie sheet.  Typically, I will use a paper towel to grab the noodles with.. they are hot! Be extremely careful during this step- you do not want the noodles to break.


Take about 2 heaping TBS of the spinach and cheese mixture and using your hands, press evenly onto each lasagna noodle.


Gently, roll the lasagna noodles to create a roll-up shape.


Set roll-ups seam side down into the sauce in the baking dish.  Repeat with the rest of noodles, filling up the baking dish.  If you want to make more, feel free to use a larger baking dish and two jars of sauce.


Pour remaining half of sauce all over the roll-ups.  Spread out evenly.  


Sprinkle the remaining 1 cup of mozzarella and 1/4 cup of Parmesan all over the top of the roll-ups.


Cover the entire baking dish with tin foil and place in oven.  Bake for 25 minutes, or until sauce is bubbling and cheese is melted.  Take the tin foil off and turn your broiler on high.  Broil the lasagna rolls until the cheese turns golden brown!  (Keep an eye on it, the cheese broils fast!)  Take out and allow it to sit for a few minutes before serving.  Enjoy! :)