Thursday, December 13, 2012

Cheesy Spinach Stuffed Portobello Mushrooms

It is a dangerous thing when I walk into Whole Foods...

I literally think I could stay in there for hours (or days) and I definitely have a tendency to go in for one thing and leave with a whole cart full of unnecessary (but so very necessary) ingredients, snacks, and treats..

Whoops..

But c'mon you can't blame me.. They have so so sooo many different food items to chose from...

Which brings me to stuffed portobello mushrooms..

I found these little gems in the produce section of Whole Foods, already stuffed and just waiting to be cooked up in my oven.  I immediately brought them home, heated them up, and it was love at first bite.

I never really had eaten a whole portobello mushroom - nor had I ever wanted to -  but who knew when stuffed with super yummy ingredients, such as spinach, peppers, and LOTS of cheese, they would be one of the best side dishes or meals ever to be placed on the table.

I decided to try my own recipe at home and stuff some of my favorite ingredients into the mushrooms and sure enough, it was a great success.

I stuffed TONS of spinach, garlic, onion, and mozzarella cheese -oh, and red pepper flakes for some heat- into the mushroom and because of the excess amount of stuffing, they were absolutely scrumdiddlyuptious.

So whether you get them from Whole Foods, follow my delicious recipe, or make up your own, I promise you will absolutely loooove these.


Ingredients:
2 large or 4 mini portobello mushroom caps
Extra virgin olive oil
1 small yellow onion, chopped
1 box frozen spinach, thawed
3-4 garlic cloves, minced
Red pepper chili flakes
1/2 cup mozzarella cheese

Directions:
Preheat oven to 350 degrees F.  Clean portobello mushroom caps under water and pat dry.


In a large saucepan, add a little drizzle of extra virgin olive oil and heat over medium heat.  Add onion to saucepan and cook until they are translucent, about 7 minutes.  Add spinach, garlic, and red chili flakes and cook for a couple minutes, until all is mixed together and heated through.    


Divide the filling into two servings and stuff the mushrooms.  Pat the filling down into the mushrooms so it gets in every nook and cranny...


Top each mushroom with 1/4 cup mozzarella cheese please.


Place cookie sheet in oven and cook for about 10-15 minutes until mushrooms are cooked through.  Turn your broiler on to high and allow the cheese to melt all over the mushrooms!  Serve immediately and enjoy :)


Tuesday, October 30, 2012

Pumpkin Stew

I loooooove Halloween.  Like a lot.

I think I love it so much because the spooky holiday is just the perfect excuse to decorate my house with cobwebs and witches hats, dress up in absolutely whatever I want, watch scary movies all day and night long, and eat one too many fun-sized Snickers bars... 

Oh, and eat stew out of a pumpkin...

That's right.  Stew.. out of a pumpkin...

Now, don't be afraid... I know you are probably thinking I am crazy. Stew in a pumpkin?! How can that be good? 

But people let me tell you... it is the best stew you will ever taste. 

My mom used to make this dinner for my brother and I every Halloween night before the trick or treating festivities began.  And I mean, kids are food's biggest critics, and if we ate this meal as little ghosts and goblins, it HAS to be absolutely delicious, right?!  

Right.

The familiar flavors of a hearty stew are all present in this new twist on the classic.  The only thing different is the delicious pumpkin flesh that you can peel away from the pumpkin, itself, and eat right along the meat, veggies, and potatoes.  (It tastes JUST like squash so if you like squash this is the best of the best- believe me.) 

This meal is a stick-to-your-rib meal and will keep you up and running all throughout the exciting night of costumes, candy, and whatever mischief you find yourself in..

So Happy Halloween everyone! I hope you have the best night full of love, spooks, and scares with family and friends! (And pumpkin stew, of course...)

Now, excuse me while I go indulge in some right now.. :)

  
Ingredients:
1 12-18 lb. pumpkin
4 large red potatoes, cut into 1-in. pieces
1 medium onion, diced
1 green pepper, 1/2-in. diced
1/2 bag mini carrots, halved lengthwise
Extra virgin olive oil
2 lbs extra lean stew meat
1 cup water
2 tsp salt
1/4 tsp ground pepper
2 TBS instant beef bouillon
1 14 1/2-oz can diced tomatoes, with juice
Vegetable oil

Directions:
Chop potatoes, onion, green pepper, and carrots.


In a large dutch oven or pot, drizzle extra virgin olive oil and add stew meat.


Cook meat over medium-high heat and brown.


Add all of the veggies to the pot.  Mix together.


Add water, salt, and pepper.  Mix together!


Reduce heat to a simmer.  Cover and cook for 2 hours!  Stir the stew throughout the 2 hours.

While the stew has cooked for at least 1 1/2 hours,  preheat your oven to 350 degrees F.  You can also start working on your pumpkin!  Cut a 6-8 inch circle around the stem of the pumpkin.  Cut off the excess flesh hanging off of the lid and remove the seeds.  Set aside.  Now, roll up your sleeves and remove all of the seeds from the inside of your pumpkin like you are 5-years old again! Scoop out the stringy pulp, but don't remove all of it!  (You want some of that pulp when you serve yourself a nice, big scoop when it is done cooking!)  Place your pumpkin in a baking dish.   Your pumpkin should looks as mine does, below.


Once your stew has cooked for the full two hours, remove the lid and stir once last time.  Now, I know the stew is not the prettiest (sooo dull in color :( )... but c'mon now stew never is!  And boy, does the taste make up for it..


Spice up the stew mix, and add the beef bouillon and canned tomatoes with juice!


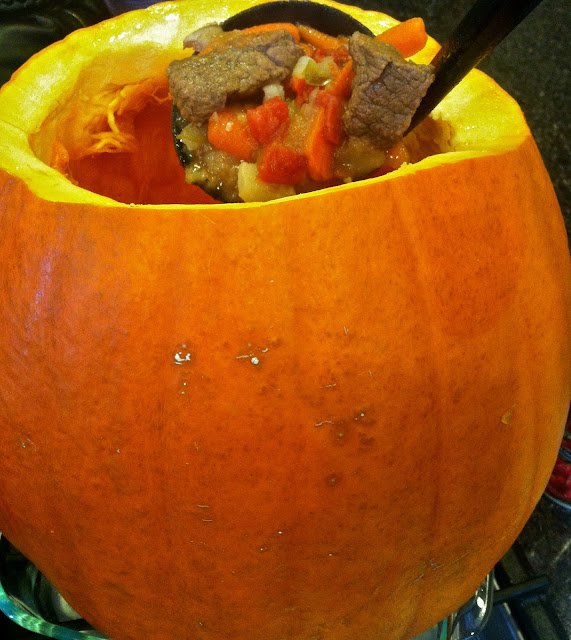
It's pumpkin time! Carefully scoop all of the stew into the pumpkin. 


Once all of the stew has been added, place the lid back on the pumpkin.  Pour a little vegetable oil on to a piece of paper towel and give the outside of your pumpkin a good rub down.  This will keep your pumpkin from burning in the oven.


Add pumpkin to oven and cook for 2 hours!  

Once it has cooked for 2 hours, carefully remove from the oven.


Carefully remove the lid of the pumpkiny cauldron and jump for joy...  are you in for a treat! ( No tricks here, people!)  Remember to scoop out a little pumpkin pulp with each serving! (The pulp on the lid is my favorite part! Tastes just like an acorn squash!) Serve with a hearty piece of bread to dip in the juices and enjoy!! Happy Halloween everyone! 


Wednesday, October 17, 2012

Caramel "Heavenly" Brownies

Caramel Brownies are probably the best invention in the brownie world.

Seriously...  I don't think there is a brownie out there that could beat this delicious piece of chocolatey, caramely, ooey gooey goodness.

A couple years ago, our family friend introduced us to these absolutely amazing brownies and I am pretty sure my whole family died and went to heaven when we first tasted them.


Although they aren't your typical chocolate fudge brownie that you may be used to, they have every single scrumptious ingredient that you could ever dream of and will change your views on brownies forever.

Chewy, buttery caramel and melt-in-your-mouth milk chocolate chips are layered in between two fluffly, light German Chocolate Cake brownie layers... can you say decadence?

I know I can. :)


Ingredients:
1 box German Chocolate Cake mix
1 1/2 stick butter, melted
1 small can sweetened condensed milk
1 bag caramel drops/mini balls (you could use wrapped caramels but I have found the balls make a much better caramely center)
1/2 bag milk chocolate chips


Directions:
In a bowl, combine German chocolate cake mix, butter, and half the container of sweetened condensed milk.  It will be a very thick batter!


Spray a large baking dish with non-stick cooking spray and add half of the German chocolate cake batter.  It is a thick dough so you may have to use your hands and push it in.  (To make sure you cut batter evenly in half, press the batter down into the bowl and using your finger, draw a line down the center.  Cut down the line with your finger and there ya have it- half of the dough!)


Bake for 6-8 minutes until it is set.  (It doesn't have to be done completely because it is going back in the oven, but make sure it is set up enough to hold some delicious fillings and other half of batter!)  While it is baking melt caramels and the other half of the sweetened condensed milk in the microwave.  Microwave in 30 second increments and make sure to stir in between.  Microwave until caramel balls have turned into a rich creamy caramel sauce.


When first brownie layer is set, take out and top with chocolate chips.. and don't worry if you use the whole bag... I mean, it wouldn't hurt anybody ;)


Pour caramel sauce ALL over the top of the chocolate chips.


Gently, top the caramel with the rest of the brownie dough.  This is easiest done by flattening pieces of the batter in between your hands and placing them on top of caramel.  Think of it as a puzzle and cover the caramel as best as you can.


Put brownies back in the oven for about 15-20 minutes until done!!   Make sure brownies are completely done before taking them out of the oven.  Let them cool completely before cutting into them....

I know, it's asking a lot... but the caramely-chocolatey ooey gooey goodness center must set up and cool before indulging... so be patient and I promise it will be worth the wait :) ENJOY!


Monday, October 8, 2012

Pumpkin Rice Krispies

Fall is FINALLY here!

And as you all know, pumpkin is my absolute faveeee Fall ingredient... So, I am extremely excited because now I have even more the excuse to try and throw it in every recipe out there. 

Rice Krispies are obviously a delicious, fun treat that pretty much everyone pretty loves, so when I saw this idea of Rice Krispies + Pumpkin, I almost fell off my chair.

These chewy, ooey-gooey treats not only bring you back to your childhood of unwrapping those shiny blue packages of deliciousness stuffed away in your elementary school lunchbox, but they also pack a punch of pumpkin flavor that totally defines Autumn in one large, chewy bite.

They are extremely simple to make and because of the addition of pumpkin, they stay very moist and surprisingly soft... of course, making them that much more scrumptious.

With only a few ingredients and a quick preparation, you will have the best little treat to enjoy on a cool, breezy Autumn day! Believe me they are sooo worth making!

So I encourage (demand) you to go make some apple cider, put your Fall decorations up, and make these absolutely delicious krispie treats...

Just try to get them out of the pot before they're all in your mouth ;) Happy Autumn!


Ingredients:
3 TBS butter
1/4 cup pumpkin, canned
10 oz bag marshmallows
1/2 tsp cinnamon
Pinch of nutmeg
Pinch of all-spice
1/4 tsp pumpkin pie spice
5 cups Rice Krispies, cereal

Directions:
In a large pot, melt butter over medium heat.

Add pumpkin once butter is melted.  Stir. (It may look like the butter evaporates when you stir, but you want it to look that way.)


Add whole bag of marshmallows.


 Consistently stir until all of the marshmallows are almost melted.


Add in spices, and stir until combined.


Let mixture sit for about 20 minutes, until room temperature.  This will help the rice krispies not become soggy when added to the mixture.


Once mixture has come to room temperature, add the rice krispies, folding them in one cup at a time.  Make sure the rice krispies are throughly incorporated.  You may have to use your hands to fold them in!


Line a 9x9 brownie pan with wax paper and press rice krispie mixture into the pan.


Cut and serve! I even cut mine using a pumpkin cookie cutter! Soo cute and soooo scrumptious!


Monday, September 3, 2012

Low Fat Chocolate Chip Pumpkin Muffins with Pecan Streusel Topping

Something huuuuge happened this week....

Pumpkin Spice Lattes are back at Starbucks. [Yay!!]

Which only means one thing, of course...  Fall is around the corner!

This excites me for two reasons.. One being that Fall is my absolute favorite time of year, and two being that I love love love loveeee pumpkin spice lattes. (So I am one happy, happy girl!)

The strong aroma and sweet, warming taste of pumpkin spice is honestly one of the most "Autumn-y" things I can think of.  It reminds me of the leaves changing, the cool breeze blowing, football games, and most importantly, bundling up in that cozy Fall apparel everyone is waiting to break back into.

Since Starbucks has declared Autumn is just around the corner, I thought it was only necessary to bake these tasty pumpkin muffins to help welcome my favorite time of the year.

With the addition of mini chocolate chips and a toasted pecan streusel topping, these pumpkin muffins are a one-of-a-kind, mouth-watering muffin that scream nothing but "AUTUMN" when you take that first giant bite.  They also taste that much better when you realize there is absolutely NO oil in the batter.. even more the reason to indulge in them.  

So I strongly advise you to go immediately to the nearest Starbucks, grab a large Pumpkin Spice Latte, and throw on your cutest apron (and best high heels, of course)... Bake these spice-filled muffins, and celebrate the beginning of Fall with a big smile on your face!

And muffin crumbs all over your shirt...


Ingredients:
2 3/4 cup flour
1 cup granulated sugar
1 TBS baking powder
1 tsp baking soda
2 TBS ground cinnamon
1/2 tsp pumpkin pie spice
1/2 tsp salt
1 1/2 cup canned pumpkin
3/4 cup fat free sour cream
1/4 cup applesauce
1 egg
1 egg white
1 tsp vanilla
1/3 cup non-fat milk
1 cup semi sweet chocolate chips, optional
1/2 cup pecans, chopped and toasted, optional

Topping:
2 TBS granulated sugar
2 tsp brown sugar
1/4 tsp cinnamon

Directions:
Preheat oven to 375 degrees F and spray muffin tin with non-stick cooking spray.  On a small cookie sheet pour chopped pecans.  Bake 4-6 minutes until you can smell pecans toasting, or until browned.  Immediately take out of oven and cool.

In a large bowl, combine flour, sugar, baking powder, baking soda, cinnamon, pumpkin pie spice, and salt.  In a separate bowl, add pumpkin, sour cream and applesauce, egg, egg white, vanilla, and milk.  Make a well in the center of the dry ingredients and pour in wet ingredients into dry.


Slowly fold in wet ingredients into dry.


Stir just until combined.  Batter will be thick and sticky.  


Add chocolate chips and half of the pecans. Combine.


Using an ice cream scoop or spoon, fill sprayed muffin tins all the way to the top.


Top muffins with remaining chopped pecans.


In a small bowl, combine sugar, brown sugar, and cinnamon to make the streusel topping.


Sprinkle the top of each muffin with the streusel topping, so pecans are completely covered.  You can always make more of this topping if needed.


Bake for 25 minutes until brown on top and when poked, toothpick comes out clean.  Cool completely, then devour!